oooo
oooo
Collimating a telescope
It’s the process of aligning its optical elements – such as the primary mirror, secondary mirror, and focuser
in a reflector (like a Newtonian or Ritchey-Chrétien), so that light comes to a precise, sharp focus at your eyepiece or camera sensor.
oooo
o
Why Collimation Matters
o
Sharpness & Detail:
Misaligned optics cause stars to appear elongated, blurry, or distorted with optical aberrations like coma or astigmatism.
Light Concentration:
Proper alignment ensures maximum light reaches your camera or eye, which is critical for faint deep-sky targets.
o
Astrophotography Accuracy:
In deep-sky imaging, collimation ensures flat fields and uniform star shapes across the entire sensor frame.
o
o
oooo
oooo
oooo

oooo
oooo
Key Steps for Collimating a Newtonian Reflector
oooo
o
Newtonian Reflector
o
Center the Secondary Mirror under the Focuser:
Look through a Cheshire eyepiece or collimation cap and adjust the central screw of the secondary mirror holder until the mirror appears round and centered directly beneath the drawtube.
Align the Secondary Mirror with the Primary Mirror:
Adjust the three outer tilt screws on the secondary mirror until the reflection of the primary mirror’s centre mark (donut) is aligned with the crosshairs of your collimating tool.
o
Align the Primary Mirror:
Adjust the collimation knobs on the back of the primary mirror cell until the reflection of your collimation tool’s central target (or laser dot) is centred inside the primary mirror’s centre ring.
oooo
oooo
oooo
oooo
oooo
oooo
o
Essential Collimation Tools
o
Collimation Cap / Cheshire Eyepiece:
Simple visual tools ideal for aligning both the secondary and primary mirrors accurately.
oooo
Laser Collimator:
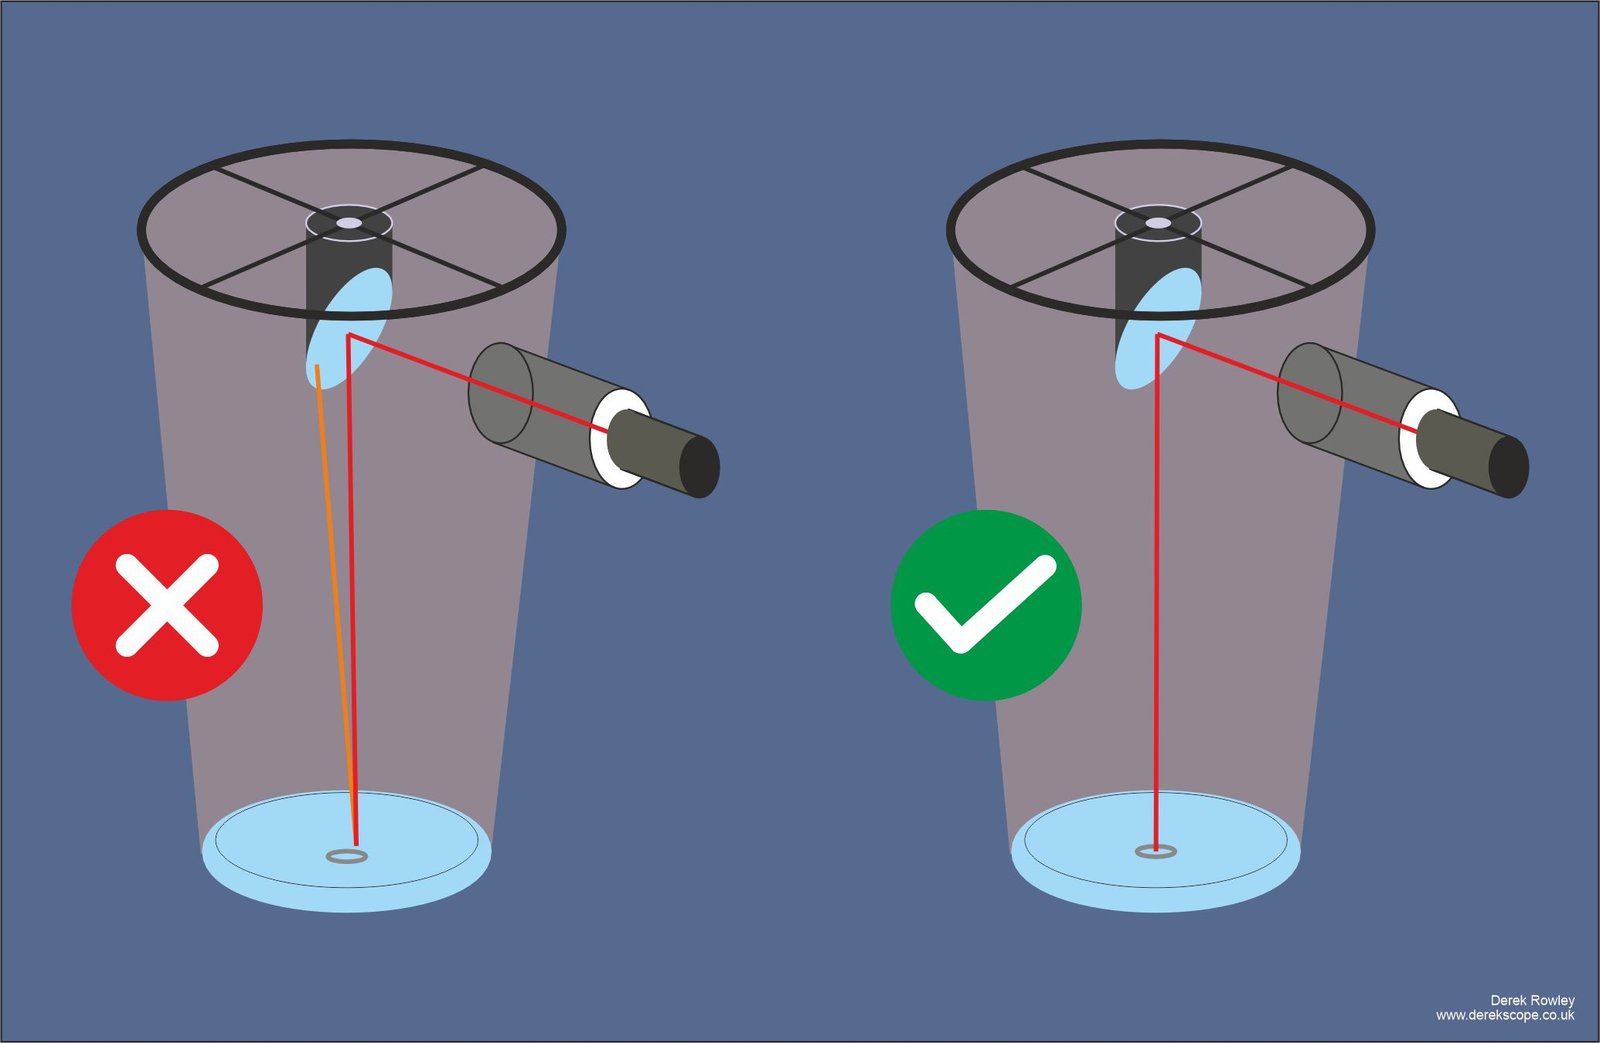
Projects a beam to quickly adjust the primary and secondary mirror alignments (requires the laser itself to be calibrated).
o
O
Auto-Collimator:
High-precision tool used to eliminate residual tilt errors, popular among astrophotographers with fast focal ratios.
o
o
oooo
oooo
oooo
Step-by-step instructions – Newtonian Reflector
Here are the step-by-step instructions for
collimating a Newtonian Reflector using a Laser Collimator
oooo
o
Step 1: Prep & Safety
oooo
Position the Telescope:
Point the optical tube horizontally or slightly upward (around 35° to 45°)
O
Never point it straight up, as dropped tools could fall directly onto the primary mirror.
o
o
Turn on the Laser:
Insert the laser collimator into the focuser drawtube and tighten the thumbscrews snugly so it sits flush and square.
oooo
oooo
oooo
oooo
o
Step 2: Align the Secondary Mirror
oooo
Primary mirror:
Look down the front opening of the telescope tube at the primary mirror.
Red Laser:
Locate the red laser dot on the primary mirror.
Ring / Donut mark:
Locate the small centre mark (ring/donut) printed on the centre of the primary mirror.
Three Outer Tilt:
Adjust the three outer tilt screws on the back of the secondary mirror housing until the red laser dot lands dead center inside the primary mirror ring.
oooo
oooo
oooo
oooo
o
Step 3: Align the Primary Mirror
oooo
Target plate:
Walk to the back of the telescope and look at the target plate on the laser collimator itself (the angled face inside the focuser view).
Adjustment knobs:
Locate the primary mirror’s adjustment knobs on the bottom of the tube cell. (Most Newtonian cells have three spring-loaded adjustment knobs and three locking screws; loosen the locking screws slightly first).
Primary mirror adjustment knobs:
Turn the primary mirror adjustment knobs while watching the returning laser dot on the target plate.
Adjust till the target:
Adjust until the returning laser beam disappears directly into the centre hole of the laser collimator target grid.
oooo
oooo
oooo
oooo
oooo
oooo
o
Step 4: Lock It Down
oooo
o
Gently & checking:
Gently tighten the primary mirror locking screws to fix the mirror position in place, checking the laser target to make sure tightening didn’t shift the alignment.
o
Completed done:
Turn off the laser collimator, remove it from the focuser, and replace your dust caps or eyepiece.
oooo
oooo
oooo
oooo
oooo
oooo
Step-by-step instructions – Schmidt-Cassegrain Telescope (SCT)
oooo
Here are the step-by-step instructions for
collimating a Schmidt-Cassegrain Telescope (SCT)
oooo
o
Step 1: Prep & Setup
o
oooo
Thermal Equilibrium:
Allow your SCT to acclimate to outdoor temperatures for 4 – 60 minutes before starting.
Setup at Night:
Point the telescope at a bright star high in the sky (Polaris works great on an equatorial mount since it stays still).
Equipment:
Use a high-magnification eyepiece or an artificial star target positioned across a long room or lawn.
oooo
oooo
oooo
oooo
o
Step 2: Locate the Collimation Screws
oooo
Look at the front corrector plate
in the centre of the telescope tube
oooo
Three small adjustment screws:
Located on the central housing hub (the back of the secondary mirror holder), you will find three small adjustment screws (Phillips, flathead, or Allen key head).
o
Note:
Unlike Newtonians, SCTs generally only require adjusting these three secondary mirror screws – the primary mirror is fixed at the factory.
oooo
oooo
oooo
oooo
o
Step 3: Align the Primary Mirror
Target plate:
Walk to the back of the telescope and look at the target plate on the laser collimator itself (the angled face inside the focuser view).
Adjustment knobs:
Locate the primary mirror’s adjustment knobs on the bottom of the tube cell. (Most Newtonian cells have three spring-loaded adjustment knobs and three locking screws; loosen the locking screws slightly first).
Primary mirror adjustment knobs:
Turn the primary mirror adjustment knobs while watching the returning laser dot on the target plate.
Adjust till the target:
Adjust until the returning laser beam disappears directly into the centre hole of the laser collimator target grid.
oooo
oooo
oooo
oooo
o
Step 4: Lock It Down
oooo
o
Gently & checking:
Gently tighten the primary mirror locking screws to fix the mirror position in place, checking the laser target to make sure tightening didn’t shift the alignment.
o
Completed done:
Turn off the laser collimator, remove it from the focuser, and replace your dust caps or eyepiece.
oooo
oooo
oooo
oooo
oooo
oooo
oooo
Back to
oooo
Back to page 21
Next to page 23
oooo
Page 22 – Collimating Telescopes Derek Rowley – Derekscope’s BSL Guide to Deep-Sky Imaging
oooo
oooo