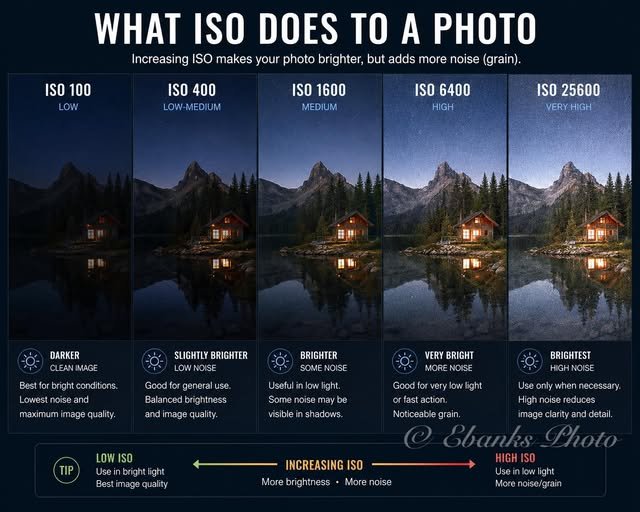
(Above infographic from Ebanks Photo – David Banks Photography, Milton Keynes)
The ISO setting on DSLRs camera for capturing Milky-Way, constellations, planets and deep-sky objects
oooo
oooo
In photography
ISO stands for International Organisation for Standardisation.
oooo
1) ISO – Camera Sensitivity
o
ISO controls how much the camera amplifies the light captured by its sensor.
High ISO (400–800 or higher):
Makes images brighter and allows you to capture objects with shorter exposures.
Low ISO:
Produces darker images but generally gives you less image noise.
Disadvantage of high ISO
It increases digital noise, making the image look grainy.
Important:
Increasing ISO does not make the sensor more sensitive to light ~ it amplifies the signal captured by the sensor.
oooo

oooo
oooo
2. Camera Settings:
oooo
Use Bulb (B) Mode:
When you need exposures longer than your camera’s normal shutter-speed limit.
o
RAW:
Save photographs in RAW format rather than JPEG.
o
Why RAW?
RAW files preserve more image information.
o
This gives you greater flexibility when editing photographs, especially when adjusting brightness, contrast and details.
oooo
oooo
oooo
oooo
3. Turn Off Image Stabilisation:
oooo
oooo
Stabilisation – Turn Off
When using a tripod, turn off lens image stabilisation.
Why?
The stabilisation system may try to correct movement even though the camera is already stationary.
o
This can introduce unwanted vibrations and make your stars appear blurry.
oooo
oooo
oooo
oooo
4. Focusing the Camera:
oooo
This is one of the most important steps in astrophotography.
The infinity symbol (∞) on your camera lens does not always give perfect focus.
Follow these steps:
- Point your camera towards a bright star or distant light.
- Turn on Live View if your camera has it.
- Zoom in digitally on the brightest star.
- Turn off autofocus because it struggles to focus in darkness.
- Set the lens approximately to infinity.
- Take a test photograph (around 20 seconds, as suggested by the book).
- Zoom into the photograph and inspect the star.
- Slowly adjust the manual focus ring until the star looks as small and sharp as possible.
oooo
oooo
Remember ~ a perfectly focused star should look like a small, sharp point of light rather than a large, blurry circle.
oooo
oooo
oooo
oooo
5. Why accurate Focus Matters
oooo
Focus is extremely important because:
oooo
- Blurry stars cannot easily be corrected during editing.
- Sharp photographs preserve more detail.
- Taking time to achieve accurate focus improves the final image.
oooo
oooo
oooo
oooo
Back to
oooo
Back to page 10
Next to page 12
oooo
Page 11 – ISO Derek Rowley – Derekscope’s BSL Guide to Deep-Sky Imaging
oooo
oooo